
I LOVE to sew useful things! Projects that I get to see and use every day make me happy, so what better project than a cord wrap and phone charging pocket for a phone that I already use every day. The inspiration for this project happened when Aimee (from Sewing for Geeks) and I were deciding on a teen focused sewing class. Tech accessories seemed like a great fit for the modern connected teen. The Cord Wrap and Cell Phone Charging Pouch are actually perfect projects for anyone learning to sew, because they’re made of felt. Felt edges don’t unravel, making for an easy and forgiving project for any new sewists.
The supplies for these projects are easy to get and inexpensive. Better yet, you don’t need a sewing machine, so you can work on your project anywhere. You totally can use a sewing machine to make the cord wrap and cell phone holder, but you don’t need it. In this post you will learn how to make the Cell Phone Charging Pocket. If you wanted to make the Cord Wrap head over here!
Get the Cord Wrap and Cell Phone Charging Pocket patterns and cut files instantly by filling out the form below. They are available in SVG for those with cutting machines, and PDF for those who want to cut it out by hand.
Ready to get started?
Get the Cord Wrap and Cell Phone Charging Pocket patterns and cut files instantly by filling out the form below. They are available in SVG for those with cutting machines, and PDF for those who want to cut it out by hand.
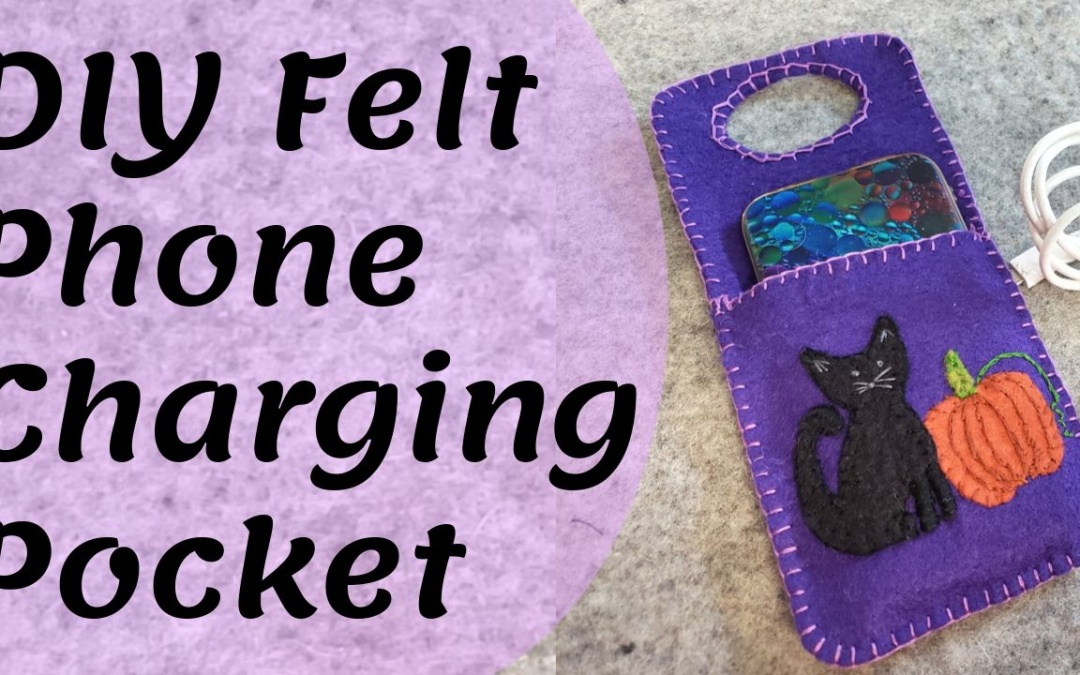
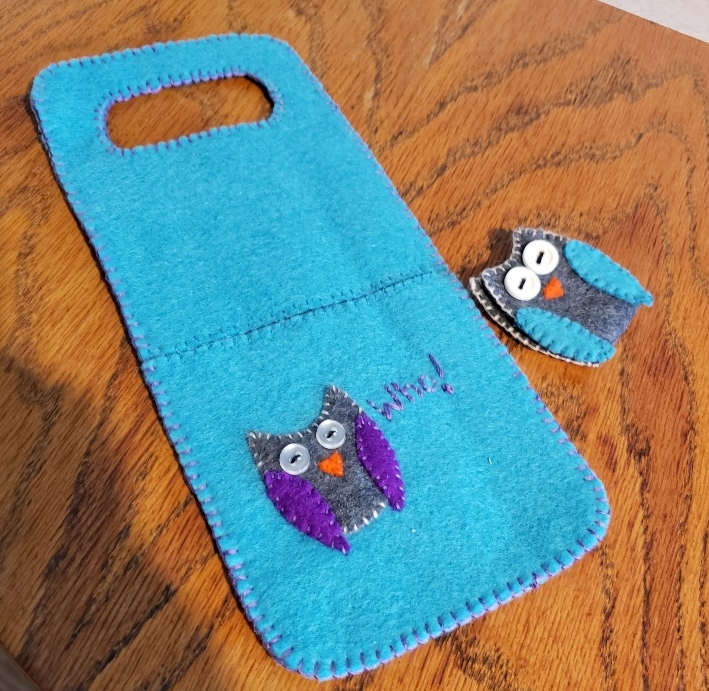
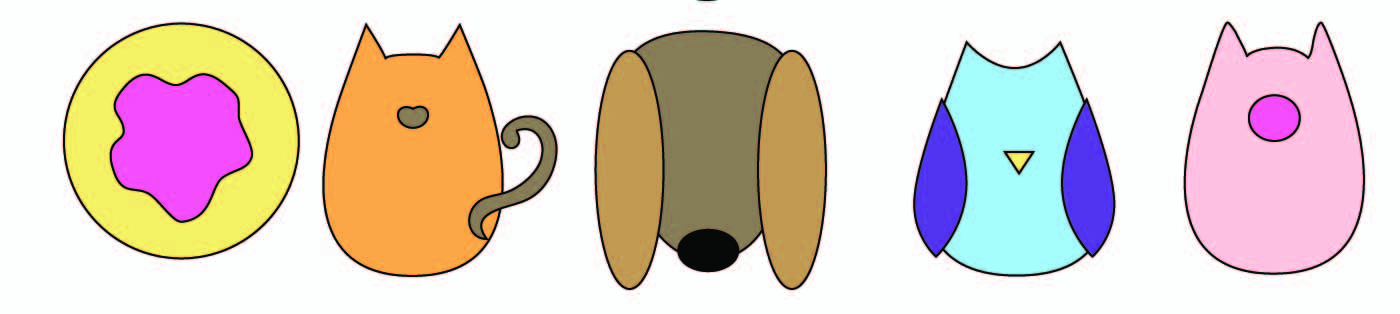
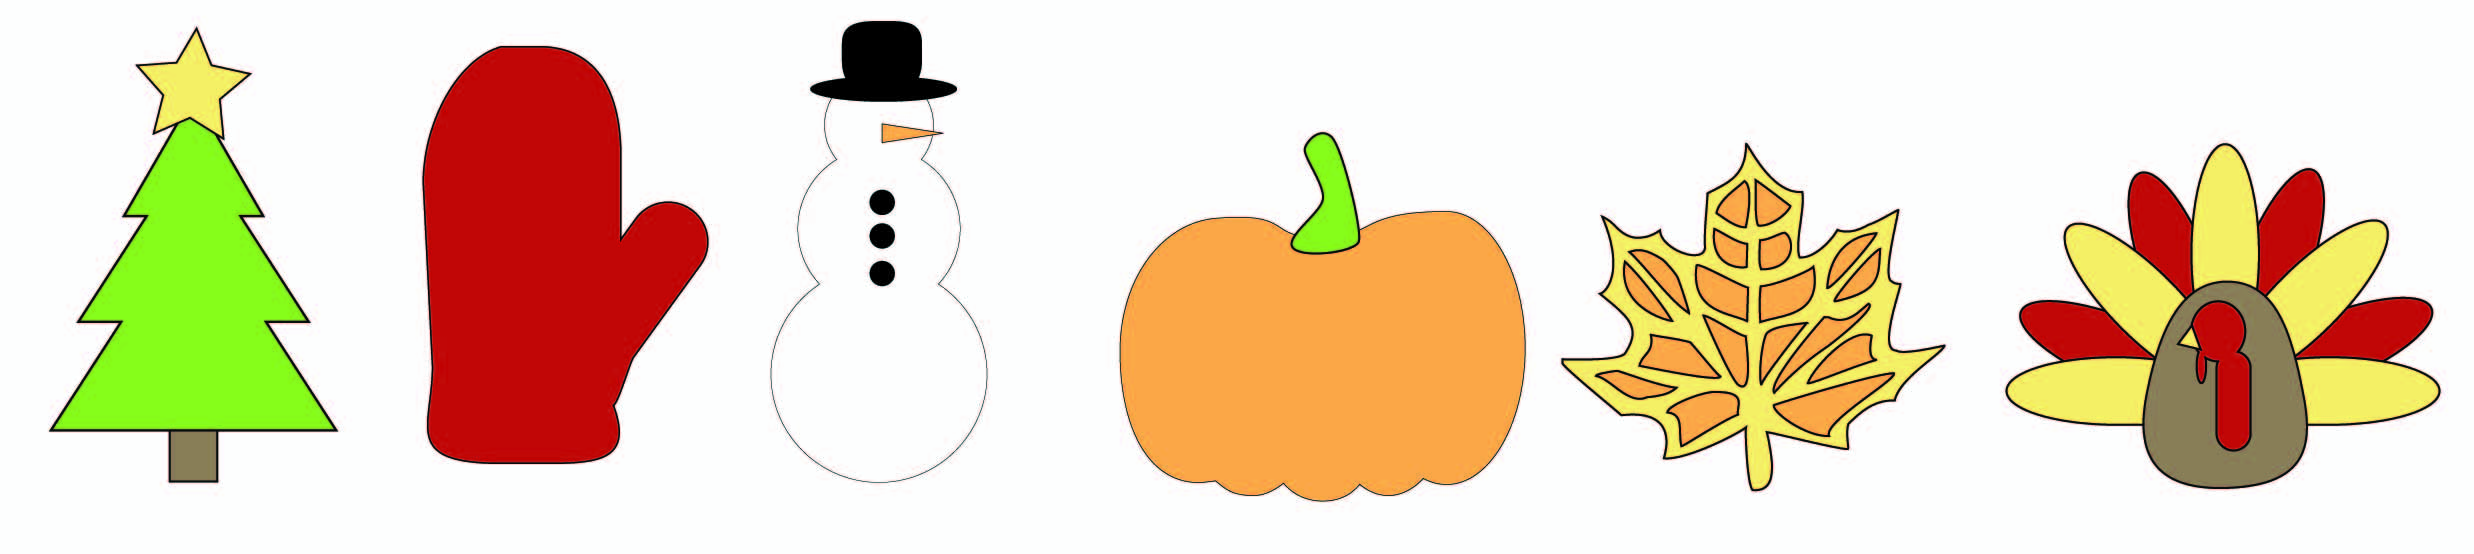
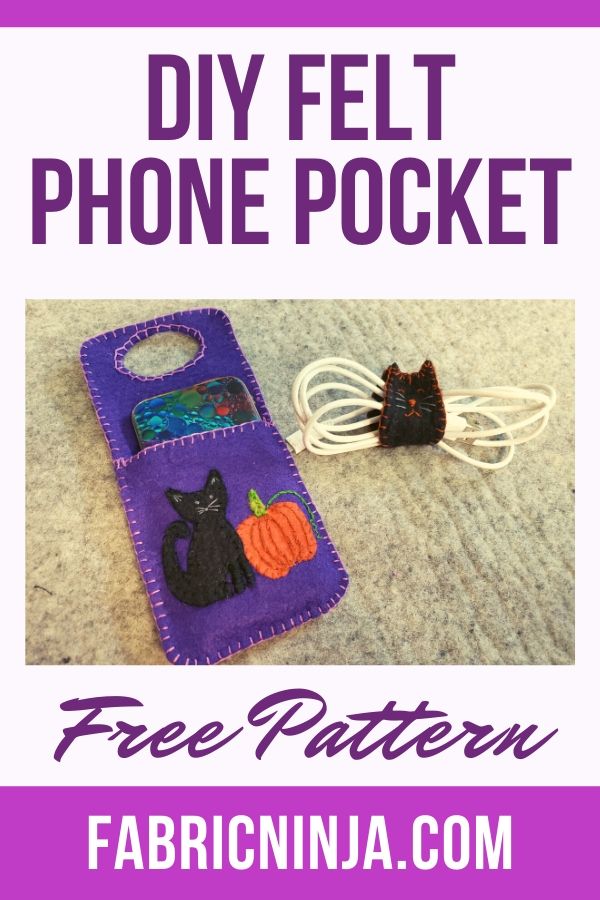
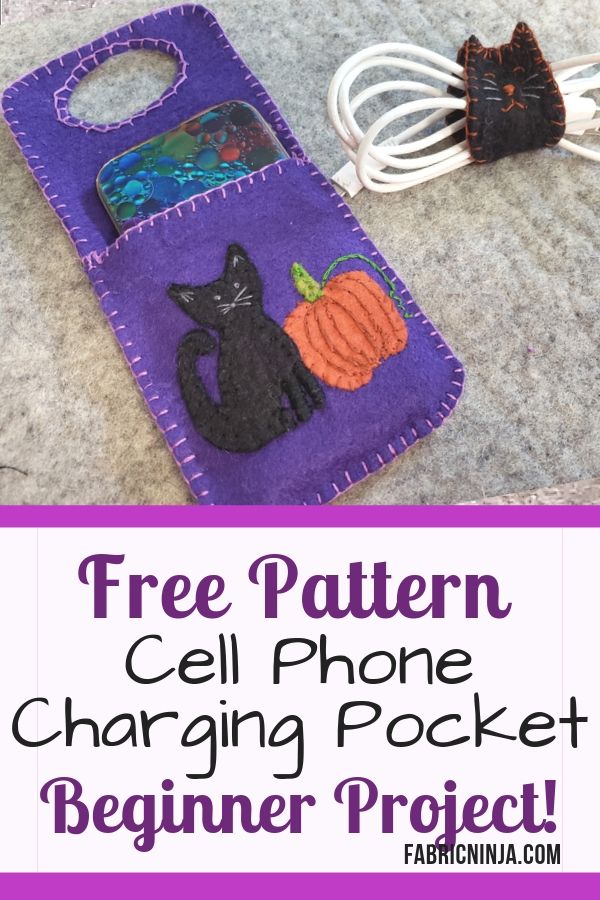
I decided to do a Halloween theme for my accessories; I’m kind of a Halloween junkie. I made an adorable black cat cord wrap and a cat and pumpkin cell phone charging pocket. Halloween not your jam? That”s ok! The pattern sheet has pig, cat, dog, or owl shapes. They are just a way of getting you started. You can personalize these in any way you want. I also have a set of fall decorations, leave, pumpkin, and turkey you might like. If you are in to Halloween and fall like I am. Or Christmas ones a snowman, mitten, and Christmas tree.
Want to make the The Cord Wrap? Click here to go to that blog post.
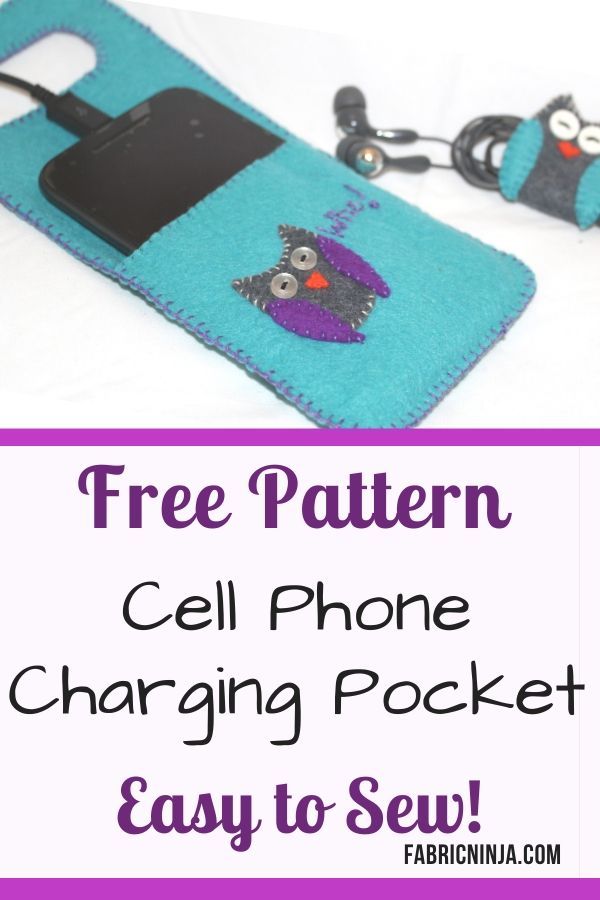
DIY Cell phone Charging Pocket.
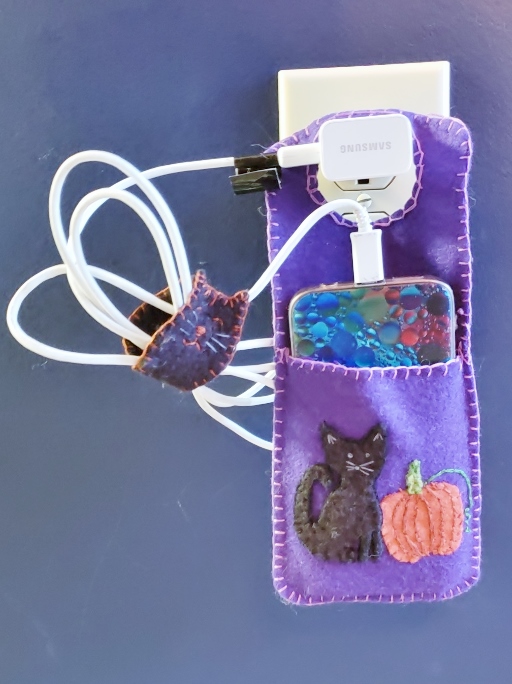
The cellphone pocket is pretty easy to use. You put your cell phone in the front pocket, and hang it through the upper hole. This keeps your phone off the ground while you’re charging it, so you don’t have to worry about anyone stepping on it.
Supplies
- Felt: 1 sheet main color, additional felt scrap in accent colors (See info below about what kind of felt)
- Embroidery Floss: 1 skein to match or contrast main color. Additional colors for accents.
- Crewel Needle: Has a larger/longer eye that will make threading your needle easier
- Tech accessory Pattern Sheet. Available in my Resource Library.
Sewing supplies:
- Scissors
- Needle threader (optional)
- Marking Pen, Chalk, or Marker
- Pins or Temporary Spray Adhesive Like Dritz 403
More About Felt
Felt can be made of several type of material. Wool or wool blend (Rayon & Wool) felt is generally a little thicker than poly felt, and is really nice to work with, so it is what I recommend. Can’t find wool felt? That’s ok, use what you can find. Craft felt is normally 100% Polyester and often quite thin. Eco felt is also plastic, but tends to be thicker. Make sure that you don’t get sticky back felt, it is not fun to sew with. You can also Upcycle wool sweaters for felt by putting them through the washer and dryer.
Marking Felt
Like fleece, felt can be difficult to mark. Sharpie works really well on felt. If you choose the right color, it will just darken the felt a bit, which makes the marks easy to hide, if you don’t cut all of the marking off. You can also hide your marks on the backside.
Assembly Directions
These instructions are written for a person sewing and cutting by hand. If you are using your cutting machine, upload the SVG file to Design Space, then remove all the pieces you don’t want to use. For example, if you are making the cat, you can hide or delete the owl and dog pieces. Then press cut, and prepare the mats as needed. The Cricut Maker does a great job cutting felt with its rotary wheel.
New to Cricut? Learn how to upload the files to Cricut Design Space here.
Step 1: Print pattern and check scale.
Get your pattern in the Fabric Ninja Freebie Library and then print it out at 100% / No Scale / Actual Size; what every option your printer has. On the printed page you will find a square that is marked with its size. Measure it to check that it got printed the right size.
Step 2: Prepare Pattern
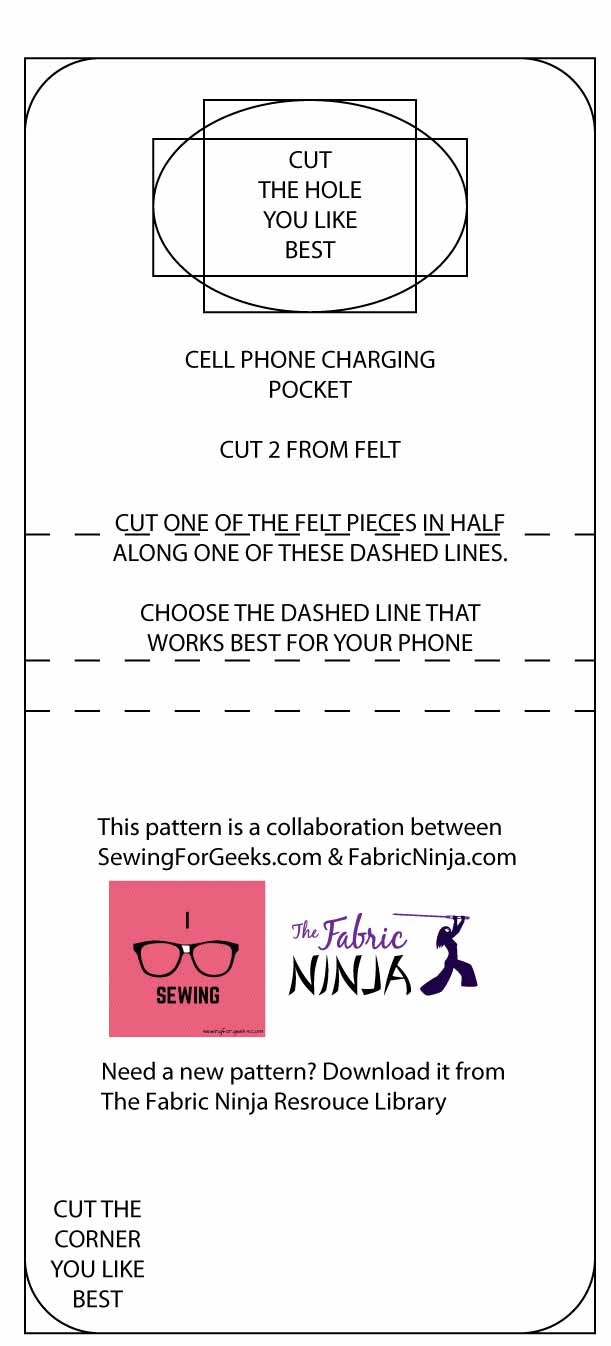
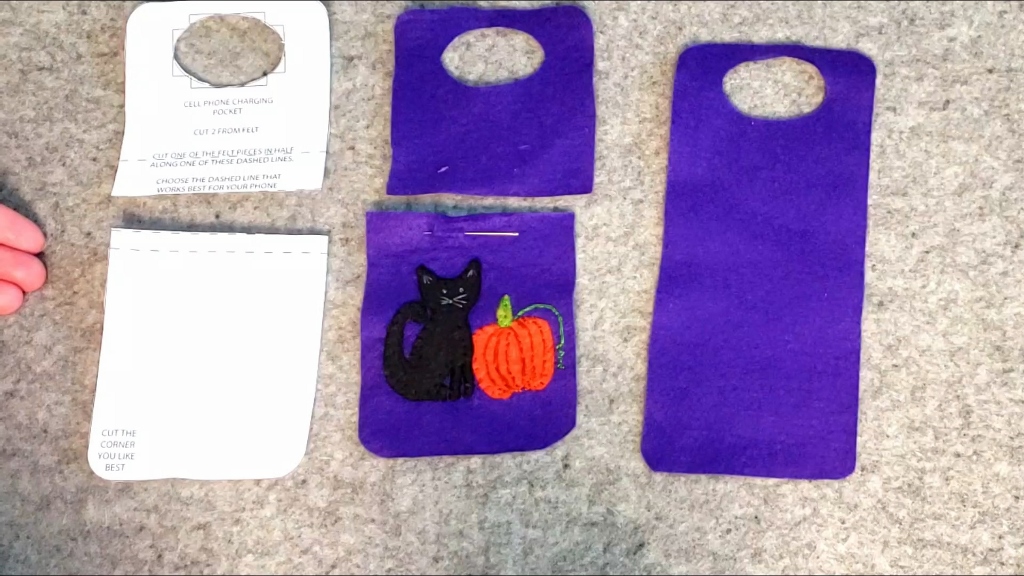
The pattern sheet has the charging pouch and the cord wraps on it. You can ignore the cord wrap pattern for now. Find the post about it here.Cut out the large rectangle from the paper pattern sheet. You can decide if you want square corners or rounded corners as you cut it out. At the top of the rectangle, you can choose what shape hole you want, whatever fits your charger best. I have chosen the oval hole for my example. To cut out the hole shape, I fold the paper in half and make a small clip, that gives me a nice place to start cutting this out.
Don’t try to save the image below, it won’t print the right size. Get the Cord Wrap and Cell Phone Charging Pocket patterns and cut files instantly by filling out the form below. They are available in SVG for those with cutting machines, and PDF for those who want to cut it out by hand.
Step 3: Pick your Embellishment
Now is the time to think about what you want your end project to look like. If you’re not feeling super creative right now you can use the pattern sheet to give you a pattern for a pig, a cat, a dog, or an owl, and they have matching cord keepers. Not into animals? How about a donut or a blank canvas that you can decorate with a sports team logo or your initials?
I also have a set of fall decorations, leave, pumpkin, and turkey you might like. If you are in to Halloween and fall like I am. Or Christmas ones a snowman, mitten, and Christmas tree.
Your design can layered felt pieces, or made of one felt piece and only embroidery on it. Take a moment to design and cut out or make pattern pieces for your embellishment.
Step 4: Cut Felt
Lay your pattern on top of your felt and hold in place with pins, tape, or temporary spray adhesive. Trace your pattern piece and the chosen hole shape (circle, square, or rectangle). Cut TWO large rectangles from your main felt color then cut out the hole (circle, square, or rectangle). Cut out any embellishment pieces, such as a cat body and tail or Owl and wings.
Step 5: Chop the Front in Half
So now you have two large pieces, the back and the front. The back, is done. It stays exactly as is. The front is going to be cut on one of the dashed pattern lines. You get to decide where you want to cut it. I suggest that you take your phone and you lay it on top, and you find the line that is either halfway or a little above halfway. This will keep your phone from tipping forward. (Circuit note: I picked the middle line for all templates, as it will work for most phones)
Cut or fold your pattern along the dashed line that you choose. Lay it on top of your front felt rectangle and chop it in half along that line. So now you have the back piece, which is whole, and you have the front piece, which is cut into two pieces.

Step 6: Decorate
So before you actually assemble this, if you’re going to decorate the front the time is now. You can decorate the bottom front and the top front (although the top will be covered when the phone is in it. Decorate whatever you want. Once we sew these two layers together it’s going to be really hard to add decoration, so do it now.
Place your cut out decoration in place. Once you like where they are, give them a bit of a rub. Felt sticks to felt, so that will mostly keep them in place while you sew. If your pieces are not staying still enough, you can pin, use a glue stick, or a spray baste.
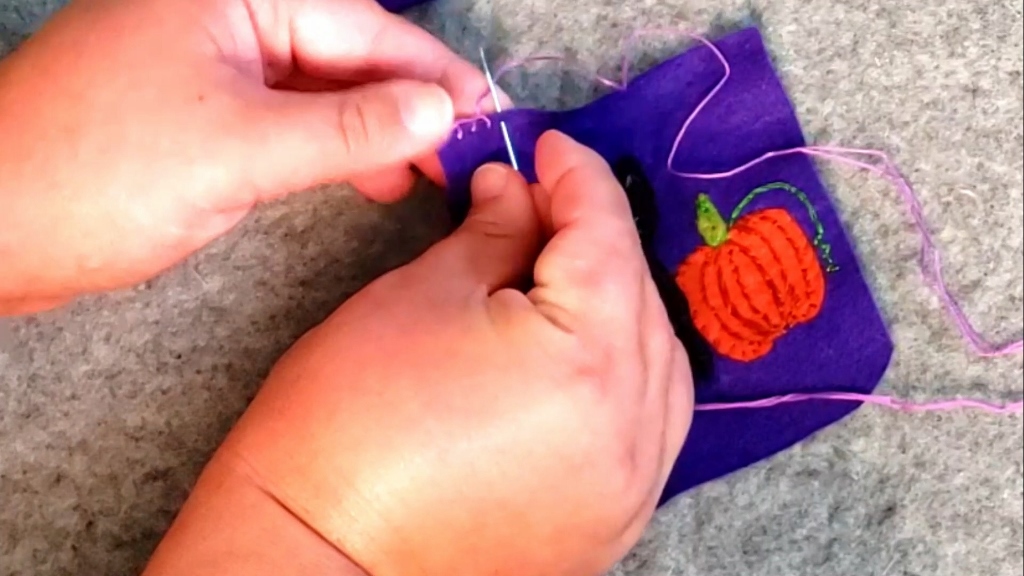
Now it’s time to load your needle. Cut a length of embroidery floss in the color you want to use first. A good length is from your finger tips to your elbow. Thread that is much longer can get more easily tangled.
Divide your thread, if desired. Embroidery floss has 6 strands/threads that are lightly twisted together. Spin the floss in your fingers to divide the threads and choose how many you want to sew with. I used 3 strands of embroidery floss for most of my decorations (the whiskers are 2 strands). If you like the thickness of the lines I made, try 3 strands to start with. You can use 1 thread all the way up to 6 threads. Thread your needle, and get sewing.
Having trouble threading your needle? Try some spit on the end of your thread or use a needle threader. Make a knot in the end of your thread, in your preferred method. I make a quilters knot, but you can use the spit and roll method. Just make a knot.
Starting from the back of the felt, sew around your design to hold it in place. Then add details like eyes and nose. I used a blanket stitch around the outline of my cat. You can learn how to make a blanket stitch in the next section. Then I covered the front legs in satin stitch. The eyes and nose are French knots and the whiskers and ears are just long stitches. Around the pumpkin I used a whip stitch to hold it in place. Then I used a split stitch to make the lines on it and the vine.
The number of stitch names can feel overwhelming, but you don’t have to worry about them. Sew in any way that feels right to you. Stitches were invented by people trying things out, so just stab that fabric till you like it.
Thread getting tangled? Try ironing your thread or use bees wax / thread conditioner on it to help it behave better. I tend to just fight with mine, but these hacks really work.
Step 7: Reinforce Cut Edge – Blanket Stitch.
So the next step is finishing these cut edges in the center. The front edge is going get a lot of wear over time, as it gets pulled on as you put your phone in and out. A line of stitching along it will definitely keep it from stretching out of shape. I am going to use blanket stitch, but you can do another stitch if you want.
I have threaded my crewel needle with three strands of embroidery floss again, in my main contrast color, and I have a put a knot in the end. I am going to make a blanket stitch along this edge.

Blanket Stitch: Also called Buttonhole Stitch
- Starting with my thread coming from the back to the front.
- Take a stitch next to the first, in the front and out the back, with the needle pointing upward.
- The needle is going to go through the center of my thread loop (tail).
- Pull up the slack, not pulling too tight. That is the first stitch.
- Make the next stitch, also going to go through the center loop again.
That starts to create a line of thread that’s going along the top edge and lines that are coming up. This will protect the top edge of the felt from being roughened up because this thread actually sits on the edge and protects it.
So you just keep taking another stitch going through that loop again. We just keep taking those stitches and letting that thread lay right along the edge.
Even Stitch Hack
So one of the things to make blanket stitch look really beautiful is to have all these stitches be the same length apart, and that’s hard. It’s something that people who have sewn for a long time just kind of eyeball and are able to do, but it’s not something that you’re expected to do the moment you start doing this type of embroidery work. So what you can do is you can help yourself out. You can either mark yourself dots along the stitch line, to help keep everything even. Or you can actually just mark you finger. When you go to take a stitch, your finger is right there, and you can follow it and just take a stitch at the next mark on my finger. A super easy way I can keep all of my stitches even as I go.

Step 8: Layer It Up
Place the two front pieces on top of the large back piece. At this point, your front pieces should be decorated, if desired, and the two cut edges in the center should have some type of stitch along them. You’re going to be sewing around the outside edge of the big pieces, as well as the inside circle.
Step 9: Sew Around the Edge
You can use blanket stitch for this, you can use a running stitch, or you can use any kind of pretty, fancy stitch that you want. It’s completely up to you and the way you want it to work. So now it’s time to sew the entire perimeter as well as the circle in there. When you run out of thread, try to hide your tie off between the two layers. Start your new thread the same way, coming from between the two layers of fabric.

Step 10: Sew Around the Hole
Now that the edge is done it’s time to sew the circle. I will again burying my thread between the two layers here, so you don’t see the knot. For my circle I’m going to do buttonhole stitch, instead of blanket stitch. It’s the same thing, just pointing the other direction. It will leave that carrier thread showing, so it kind of highlights the circle a little bit.
Once you’re all the way around, you get back to that beginning, and I take a stitch basically right in the same spot, and then I hook my needle through that first carrier thread so that everything lines up. Then I just put my needle to the backside, and tie off there.

With that last stitch you’re now done. Who are you going to share this project with?
Get the Cord Wrap and Cell Phone Charging Pocket patterns and cut files instantly by filling out the form below. They are available in SVG for those with cutting machines, and PDF for those who want to cut it out by hand.
Want to remember this? Pin this Felt Cell Phone Charging Pocket to your sewing Pin Board.
[mc4wp_form id=”922″]
cute and a great idea to teach a teen or preteen how to cut,and do some hand stitching. thanks